

Tattoo Aftercare: A Complete Step-by-Step Guide
Reviewed and Written by Top Tattoo Places Team » Published on 26 January, 2026
Getting a tattoo is exciting, but the real responsibility begins the moment you step out of the studio. Tattoo aftercare isn’t just about keeping your new ink looking good, it’s essential for preventing infections, preserving the artwork, and ensuring long-term skin health.
In this complete 2025 guide, we’ll walk you through the exact tattoo aftercare process step-by-step, with medically-backed advice, expert tips, and a realistic healing timeline. Whether you’re new to tattoos or adding your tenth piece, this guide covers everything you need to heal right and protect your investment.
Why Tattoo Aftercare Matters More Than You Think
A tattoo is more than ink on skin, it’s an open wound that needs proper care to heal safely and preserve the artwork. Whether you’ve just got your first tattoo or you’re a seasoned collector, aftercare isn’t optional. It’s the only thing standing between your new ink and problems like:
- Infections and scarring
- Patchy colour loss
- Excessive scabbing and delayed healing
According to dermatologists and professional tattoo artists, how you treat your skin in the first four weeks directly affects the quality and longevity of your tattoo.
“You can get the best artist in the world, but if you don’t take care of it properly, it won’t heal the way it should.” – Artist from Los Angeles (quoted by InkedMag)
The goal of this guide is to give you clear, updated 2025-based tattoo aftercare advice you can actually follow, backed by expert knowledge and real-world results.
Tattoo Healing Timeline: Day-by-Day Breakdown
Tattoo healing doesn’t happen overnight. It goes through different stages, and your skin behaves differently in each one. Here’s what to expect from Day 1 to Week 4, and how to care for your tattoo at each step.
Day 1–2: The Fresh Ink Phase (Critical First 48 Hours)
As soon as your tattoo is done, your artist will clean the area and cover it with a sterile bandage or wrap. This is to protect it from bacteria and airborne contaminants.
What to do:
- Leave the bandage on for 2–4 hours unless your artist says otherwise.
- Wash your hands thoroughly before touching your tattoo.
- Gently remove the wrap and wash the area with lukewarm water and fragrance-free soap.
- Pat dry using a clean paper towel (don’t rub).
- Apply a thin layer of tattoo ointment (like Aquaphor or a product your artist recommends).
What to avoid:
- Don’t use hot water.
- Don’t rebandage unless you’re using Saniderm or Second Skin (explained in Part 2).
- Avoid direct sunlight, dirty clothes, and physical contact with pets.
- Normal things you might notice:
Some redness, light swelling, clear plasma, or ink residue. - Mild soreness or tenderness, similar to a sunburn.
Note: Plasma helps your tattoo start the healing process, but too much of it sitting on the skin can lead to heavy scabbing. Clean gently and on time.
Day 3–7: Peeling & Itching Begin (The Flaky Week)
This is when many people panic but it’s actually a sign your tattoo is healing correctly.
What happens:
- Your skin begins to dry out and flake.
- Light scabbing may form (don’t pick or scratch).
- Itching increases as dead skin sheds and new skin forms beneath.
What to do:
- Continue washing gently 1–2 times daily.
- Apply a fragrance-free lotion or recommended aftercare balm 2–3 times a day.
- Wear loose clothing to avoid friction.
What to avoid:
- Scratching or peeling the flakes (this causes patchy spots).
- Submerging your tattoo in water (no swimming or long baths).
- Over-moisturising (it can clog the skin and cause pimples or irritation).
Pro Tip: Use clean hands only no loofahs or sponges. Your skin is still highly sensitive during this phase.
Week 2–4: Colour Softening and Deeper Healing
Now the outer layer of your skin is mostly healed. But deeper layers are still repairing themselves beneath the surface.
What you’ll notice:
- Slight dullness in colour (don’t worry it’s normal).
- Itchiness reduces gradually.
- Your skin might feel tight or waxy in appearance.
Recommended care:
- Keep applying moisturiser 1–2 times daily.
- Avoid sun exposure completely or use a tattoo-safe SPF if you step out.
- Stay hydrated and support healing from the inside (vitamin C, good sleep, no smoking if possible).
Don’t do this yet:
- Avoid the gym if the tattooed area rubs against equipment.
- Still no direct water exposure (pools, hot tubs, oceans).
- Don’t exfoliate or shave the tattooed area.
Reminder: While the skin may look healed from outside, internal healing continues for up to 8 weeks, especially for large or colour-heavy tattoos.
Month 2–3: Internal Healing & Final Touches
After about 4–8 weeks, your tattoo may look fully settled. But the deeper dermal layers (where the ink lives) are still adjusting.
What this means:
- The ink stabilises in the skin and colours start looking richer.
- Scarring (if any) becomes noticeable now this is when you’ll know if aftercare was handled right.
- Any remaining dryness fades as your skin regenerates naturally.
Care tips at this stage:
- Shift to light, daily moisturising as needed.
- Start using sunscreen with SPF 50+ on the tattoo daily to protect against UV fading.
- Book a touch-up session if required many artists offer it free within the first 3–6 months.
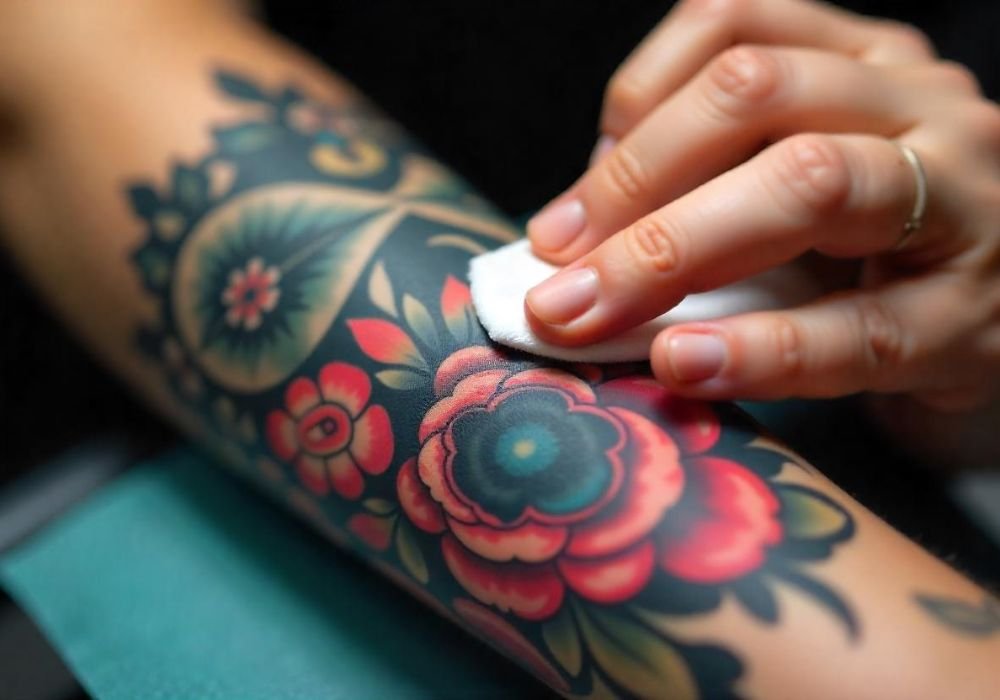
How to Clean Your Tattoo Safely (Without Damaging It)
Cleaning your tattoo may seem simple, but this one step can make or break your healing process. Every time you wash it wrong, too rough, too hot, or with the wrong product you’re risking irritation, infection, and colour distortion.
Here’s the correct method to clean a fresh tattoo in 2025:
Step-by-Step Tattoo Cleaning Routine
› Step 1: Wash your hands thoroughly
Before touching your tattoo, scrub your hands with soap for at least 20 seconds.
› Step 2: Use lukewarm water
Never go for hot water. Keep the temp slightly warm to help loosen dried plasma and ink without irritating the skin.
› Step 3: Gently apply a fragrance-free soap
Use your fingers (not a washcloth or loofah) to softly rub the soap over the tattoo.
› Step 4: Rinse lightly and thoroughly
Make sure no soap residue is left behind, as it can cause itching or dryness.
› Step 5: Pat dry with a disposable paper towel
Never rub or use regular cloth towels. Tap lightly and let the skin breathe for a minute before applying anything.
Best Tattoo-Friendly Soaps in 2025
| Product Name | Type | Why It’s Safe |
|---|---|---|
| Cetaphil Gentle Skin Cleanser | Mild, non-soap | Won’t strip natural oils |
| Dial Gold Antibacterial | Bar soap | Artist-favourite, fights bacteria |
| Dr. Bronner’s Unscented Baby Soap | Liquid Castile | Organic & fragrance-free |
| H2Ocean Blue Green Foam Soap | Tattoo-specific | pH balanced & cooling |
Avoid Dettol, Lifebuoy, or any antiseptic/harsh soaps they can delay healing or trigger rashes.
Moisturising Your Tattoo: When, What, and How
Your tattoo needs moisture but too much or too soon can cause breakouts, clogged pores, or sticky buildup under scabs.
When to start moisturising:
Start 24 hours after your first wash, once the tattoo feels dry to the touch. Apply 2–3 times a day unless your artist suggests otherwise.
How to Apply Moisturiser Correctly:
- Use clean hands only
- Apply a very thin layer enough to hydrate, not smother
- Massage gently until absorbed
- Never let product pool or sit shiny on your tattoo
Best Moisturisers for Tattoo Aftercare in 2025
| Product | Key Benefits | Suitable For |
|---|---|---|
| Aquaphor Healing Ointment | Creates a breathable barrier | First 3–5 days |
| Aveeno Daily Moisturising Lotion | Non-greasy, fragrance-free | Sensitive skin |
| Hustle Butter Deluxe | Vegan, soothing, smells nice | Full healing phase |
| Tattoo Goo Lotion | Tattoo-specific formula | All skin types |
Aquaphor is great early on, but switch to a lotion after 3–5 days to avoid clogged pores.
What Not to Use on a Healing Tattoo
Even in 2025, people still fall into common traps. These products are either too thick, too harsh, or simply not made for open wounds.
Avoid These Products:
- Vaseline / Petroleum Jelly: Too heavy, traps bacteria
- Coconut Oil / Olive Oil: Natural but pore-clogging
- Scented lotions (Nivea, Dove, etc.): Fragrance = irritation
- Aloe vera gel (store-bought): Often contains alcohol or chemicals
- Any DIY or herbal mix: Unless your artist recommends it, skip it
If it smells strong, stings, or leaves a sticky film it’s not meant for your tattoo.
When to Switch Products During Healing
- Days 1–3: Stick to ointments like Aquaphor or a tattoo balm
- Days 4–14: Shift to a light, non-greasy lotion (Aveeno, Hustle Butter)
- After 2–3 weeks: Moisturise once daily or as needed based on skin type
Listen to Your Tattoo Artist
Tattoo artists know what works with the ink they use, the skin type they’re dealing with, and the environment you’re in. Some might recommend Saniderm, while others prefer traditional healing with balms.
“One method doesn’t fit all. Always ask your artist for aftercare tailored to your tattoo style and location.” – Chicago-based Artist, 2025
Saniderm vs Traditional Tattoo Aftercare: Which One's Better?
If you’re new to tattooing, there’s a good chance your artist mentioned Saniderm, Second Skin, or some kind of transparent film dressing. It’s a modern alternative to the old-school wash–dry moisturise cycle.
But does it really make healing easier? Or is the traditional method still reliable?
Let’s break it down:
Step-by-Step Tattoo Cleaning Routine
Pros:
- Complete control over cleaning and moisturising
- Cheaper only need a good lotion and soap
- Better for people with sensitive skin or allergies to adhesives
Cons:
- Requires more attention (washing 2–3 times/day)
- Risk of over- or under-moisturising
- Tattoo is more exposed to friction, bacteria, dust
Saniderm / Second Skin Aftercare
What it is: A thin, breathable, waterproof adhesive film applied by your artist (or yourself) that stays on for 3–7 days. It creates a protective barrier that keeps out bacteria and locks in your body’s natural healing fluids.
Pros:
- Hands-free healing no cleaning needed for first few days
- Less risk of scabbing or infection
- Protects from dirt, sweat, friction
Cons:
- Can cause irritation or allergic reaction in some people
- If applied incorrectly, may trap excess plasma or bubbles
- Expensive compared to traditional care
Quick Comparison Table
| Feature | Saniderm / Second Skin | Traditional Method |
|---|---|---|
| Effort | Minimal | High (needs regular care) |
| Risk of Infection | Very low | Moderate |
| Cost | High | Low |
| Ideal For | Busy lifestyles, travelling | Sensitive skin, DIY care |
Tattoo artists often recommend Saniderm for first-timers or large pieces it keeps the tattoo protected while reducing scabbing.
Browse Tattoo Aftercare-Ready Studios by State

California

Colorado

Nevada
